The Definitive Guide to Installing Arch Linux
Published on Jul 18, 2024
My better judgement told me not to make this post. But here we are, a definitive, beginner friendly guide to install Arch Linux.
Before we continue I just wanted to give everyone a little back story as to my Arch Linux adventures. Well starting off, Arch was my very first Linux distribution. Yeah I didn’t start with something easy like Ubuntu or Linux Mint.
And the only reason I somewhat survived this is because of the amazing help of an old friend @SolomonTech. He is the craziest Linux user I know and he has mained Arch Linux for the last 4+ years. And Sol if you read this, I am writing this guide in your memory.
Alright so back to the actual reason for this post, installing Arch Linux.
Contents
- Creating the Live ISO
- Networking
- Partitioning
- Installing to the Drive
- Final Steps
- Post Install Notes
Creating the Live ISO
Ok so let’s download the ISO and flash it to a spare 8-16GB USB.
First download the arch ISO from this link, scroll down to the countries and find your closest one, download the file ending with .iso
Linux Users
- Check
lsblkfor your USB flash drive, for example mine will be/dev/sdb - Still in the terminal navigate to the folder where the ISO is and run:
sudo dd bs=4M if=archlinux.iso of=/dev/sdb status=progress oflag=syncMake sure to change archlinux.iso to the file name of the ISO you just downloaded and change /dev/sdb to your flash drives identifier.
Windows Users
- Get Rufus
- Install Rufus, select the ISO and your flash drive and click Start, then run in ISO mode. You don’t need to change any other settings.
Ok so now that we have our boot-able flash drive let’s plug it into the computer you want to install Arch on and reboot it. I’m sure for anyone reading this you do know how to do stuff like entering BIOS and booting a flash drive but for those who are not familiar just hold DEL or F12 on your keyboard whilst your computer is turning on to bring up the boot menu, this key can be different depending on your motherboard so if your having trouble lookup the motherboard brand to find the key to open the “Boot Menu”.
From there select your flash drive, then when the Arch installer boots just press enter on the first option.
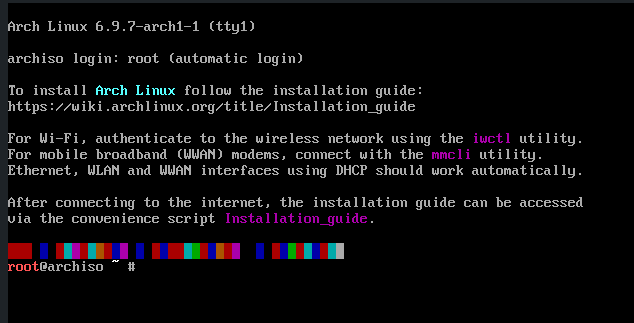
You should have been greeted with “Welcome to Arch” or something similar and now be in a terminal with some instructions printed at the top.

Networking
If you have a ethernet cable connected to your computer, internet will work out of the box but if you have Wi-Fi only stick around for this next short bit.
# Enter the IWD shell by typing:
iwctl

#
# BEGIN IWD SHELL COMMANDS
#

# List your wireless devices
device list

# Replace $NAME with the name of your wifi device

# Power on your adapter if it isn't already
device $NAME set-property Powered on

# Scan for networks and list them
station $NAME get-networks

# Remember the SSID value outputted here

# Connect to an available network with password
station $NAME connect $SSID

# Should have been successful, exit shell
exit

#
# END IWD SHELL COMMANDS
#
And with that you should be connected, if your not for any reason please check out the Arch Wiki on IWD and Networking.
Partitioning
Before we jump right into partitioning though let’s set our timezone.
# List available timezones, Navigate the list using `j` for down `k` for up and `q` to exit.
timedatectl list-timezones

# Replace Country and City with yours
timedatectl set-timezone Country/City
Now we can partition,
However I need to explain some basic fundamental concepts of drive labels.
All drives are prefixed with /dev/ SATA Drives like SSD’s or HDD’s will always be /dev/sdX the X is a letter between A and Z to identify your drive.
So the first SATA drive will always be /dev/sda and the second might be /dev/sdb
SATA drives show their partition number by a number right after the label, so partition 1 on /dev/sda would be /dev/sda1 and so forth.
NVME Drives or M.2 drives will always be /dev/nvme0nX where X is the number that orders these drives. So if you have 2 NVME drives and want the second one that would be /dev/nvme0n2
NVME drives show their partition number by a p then a number right after the label, so partition 1 on /dev/nvme0n2 would be /dev/nvme0n2p1 and so forth.
# Find your drive identifier
lsblk

# You can typically tell which drive is the one
# you want to install on by the size and whether
# it is `nvme` being a M.2 drive or `sdX` being
# a SATA drive as explained earlier

# Going forward I'll be using `/dev/sda`

# Enter the fdisk utility
fdisk /dev/sda

#
# BEGIN FDISK COMMANDS
#

# Create a new GPT label
Command: g

# Print the current partition table
Command: p

# If any partitions exist just press `d` and Enter until they are all gone.

# Create a new EFI boot partition
Command: n
Number: 1
Primary or Extended: p
First Sector: Enter
Last Sector: +1G

# Now select the EFI system type
Command: t
Number: 1
# Type capital L to see all types, EFI System should
# be the first
Partition Type: 1

# Create a new swap partition
Command: n
Number: 2
Primary or Extended: p
First Sector: Enter
Last Sector: +4G

# Now use the Linux swap type
Command: t
Number: 2
# Type capital L to see all types, Linux swap should
# be number 19
Partition Type: 19

# Create the root partition
Command: n
Number: 3
Primary or Extended: p
First Sector: Enter
Last Sector: Enter

# Use Linux root x86-64 type
Command: t
Number: 3
# Type capital L to see all types, Linux root x86-64
# should be number 23
Partition Type: 23

# Now save changes and quit
Command: w

#
# END FDISK COMMANDS
#
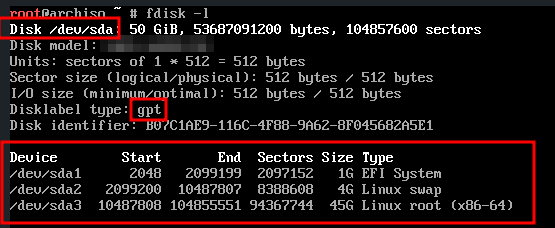
Now running fdisk -l should show the following

Finally we need to format these partitions.
# Format the root partition
mkfs.ext4 /dev/sda3

# Format the swap partition
mkswap /dev/sda2

# Format the EFI partition
mkfs.fat -F 32 /dev/sda1

# Now mount the drives
# Mount the root partition
mount /dev/sda3 /mnt

# Mount the EFI partition to boot
mount --mkdir /dev/sda1 /mnt/boot

# Turn on swap for the swap partition
swapon /dev/sda2
Congrats you are now half way through!
Installing to the Drive
First we need the closest servers for the package manager so we have the best speeds.
Quick heads up for Vim usage, press i to enter insert mode, ESC to exit insert mode, and :wq to “Write” and “Quit”.
# Replace AU with your country identifier
curl -s "https://archlinux.org/mirrorlist/?country=AU&protocol=https&use_mirror_status=on" > /etc/pacman.d/mirrorlist

# Edit the mirrorlist file and un-comment the lines # with Server, see the example below
vim /etc/pacman.d/mirrorlist

# Exit vim with :wq when your done
As an example change this:
## Australia
#Server = https://syd.mirror.rackspace.com/archlinux/$repo/os/$arch
## Australia
#Server = https://sydney.mirror.pkgbuild.com/$repo/os/$arch
## Australia
#Server = https://au.mirrors.cicku.me/archlinux/$repo/os/$arch
## Australia
#Server = https://mirror.aarnet.edu.au/pub/archlinux/$repo/os/$arch
## Australia
#Server = https://archlinux.mirror.digitalpacific.com.au/$repo/os/$arch
## Australia
#Server = https://gsl-syd.mm.fcix.net/archlinux/$repo/os/$arc
To this:
## Australia
Server = https://syd.mirror.rackspace.com/archlinux/$repo/os/$arch
## Australia
Server = https://sydney.mirror.pkgbuild.com/$repo/os/$arch
## Australia
Server = https://au.mirrors.cicku.me/archlinux/$repo/os/$arch
## Australia
Server = https://mirror.aarnet.edu.au/pub/archlinux/$repo/os/$arch
## Australia
Server = https://archlinux.mirror.digitalpacific.com.au/$repo/os/$arch
## Australia
Server = https://gsl-syd.mm.fcix.net/archlinux/$repo/os/$arc
Now our mirrors are setup lets install all the core packages into the new system.
# Install linux kernel and firmware
pacstrap -K /mnt base linux linux-firmware sudo vim dhcpcd networkmanager

# Generate fstab from system config to new system
genfstab -U /mnt >> /mnt/etc/fstab
Final Steps
Now we are ready to switch into the new install via arch-chroot and set the final things up.
# Chroot into the new system
arch-chroot /mnt

#
# BEGIN CHROOT COMMANDS
#

# Copy timezone info, replace Country and City
# just like before
ln -sf /usr/share/zoneinfo/Country/City /etc/localtime

# Sync clock
hwclock --systohc

# Generate locals
locale-gen

# Set your system hostname, this will be your
# systems name on the network and show in the terminal
# like `user@hostname`
echo $HOSTNAME > /etc/hostname

# Generate initramfs image
mkinitcpio -P

# Set root user password
passwd

# Install packages for bootloader and networking in
# the new system
pacman -S grub efibootmgr

# Mount the EFI partition
mount /dev/sda1 /boot

# Install grub
grub-install --target=x86_64-efi --efi-directory=/boot --bootloader-id=grub-boot

# Intialize bootloader configuration
grub-mkconfig -o /boot/grub/grub.cfg

# All done, exit the chroot
exit

#
# END CHROOT COMMANDS
#
That is it! Now just run the following before rebooting.
# Umount drives
umount -R /mnt

# Reboot!
reboot
When your screen turns off you can unplug the USB and hold the boot menu key, then select Arch.
Once in you will be prompted with a login screen, enter root for the user and whatever the password is you set earlier.
Congrats you are now in your new Arch Linux system!
Post Install Notes
Now if I covered everything for the post install this guide would be go on forever so I’ll just cover the important things.
Now that your logged in as root run:
systemctl start dhcpcd.service

# IF ETHERNET
# Get the name of your adapter, example: enp0s3
ip link

# Start it and the dhcpcd service
ip link set enp0s3 up
systemctl enable [email protected]

# IF WIFI
systemctl enable NetworkManager
systemctl start NetworkManager
# In the TUI do Activate a connection
nmtui
Last thing we need to do is create a user and give it privileges.
# Create user with wheel group and bash shell
# Replace $USERNAME with yours
useradd -m -G wheel -s /bin/bash $USERNAME

# Set the password for the user.
passwd $USERNAME

# Edit the sudoers file so the user has perms
EDITOR=vim visudo

# Add the following to a new line
%wheel ALL=(ALL:ALL) ALL

# Exit and save with
:wq
Now you can exit and login to your new user with sudo permissions! Start installing some packages with sudo pacman -S.
I hope you enjoyed and benefited from this guide, again huge shoutout to my man SolomonTech. If you liked this post please leave a like and maybe even a comment, I love responding to them all!
Until next time, bye!